Browsing "Older Posts"

Browsing Category "Starting A Blog"

How To Start A WordPress Blog From Scratch in 2025?

By Ashutosh Jha → Monday, January 20, 2025
How to start a WordPress blog from scratch is probably one of the most widespread topics in the blogging niche.

There are multiple platforms on which you can start your new blog. A few of those are WordPress.com, WordPress.org, Blogger.com, Drupal, and many others. Some are free and some cost money. Among all these, WordPress.org is the most widely used, recommended, and best of all - free.

How To Start A WordPress Blog From Scratch
Before we begin, you have two options:

  • If you are starting from zero - skip the paragraph below and continue reading this guide.
  • If you already have an existing website or an eCommerce store, or if you use one of the website builder platforms - you might not need a WordPress blog since the majority of other platforms (e.g. Shopify, BigCommerce, Volusion, or Wix) has blogging features built into the platform. If that’s the case, we recommend visiting SupplyGem that covers eCommerce platforms, has comprehensive how-to guides, and more.

It is also no more secret that blogging is just a hobby; it is a profession and business. And so, you need a blog that should have the capability to turn into a business.

In this how to start a WordPress blog from the scratch guide, I will discuss all the steps in detail. I’ll ensure that this is the only guide you’re following to start a WordPress blog from scratch.

For simplicity, I am going to categorize this how to start a WordPress blog from the scratch guide into a different segment.

1. Platform selection
2. Niche selection
3. Domain Name selection
4. Choose Hosting
5. Theme Selection
6. Creating content for the blog
7. Working on On-Page SEO
8. Off-Page SEO
9. Blog/Content Promotion
10. Generating Money from the blog

I will be basically taking care of all the above 10 points in this how to start a WordPress blog from scratch guide.

Let’s start with each module in detail and start a WordPress blog from scratch.

How to start a WordPress blog from scratch- The Only Guide you need

Our main aim is not just to get you started but also to show you how to earn from the blog. This massive guide on how to start a WordPress blog from scratch will give you all the insights of starting blogging.

Platform Selection

Well, as I mentioned earlier, there are lots of blogging platforms available like WordPress.org, WordPress.com, Blogger, Drupal, etc. and all are doing good. The thing is where WordPress.org (self-hosted WordPress) has a greater market share, Drupal or others have very little.

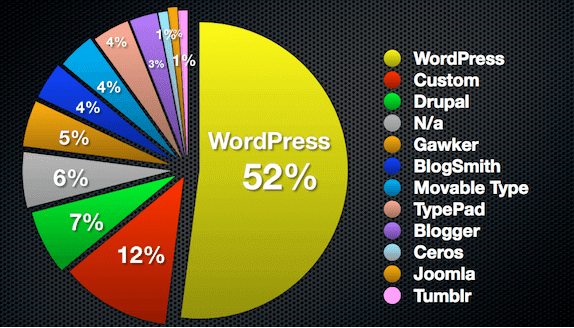
From the below pie chart you can check that over 52% market as a blogging platform is captured by WordPress.org followed by custom blogs, Bloggers, and others.

Blogging Platforms
So, I will also suggest you go through a self-hosted WordPress blog (WordPress.org). There are multiple benefits to it. Although it is a bit costlier but will add a flavor.

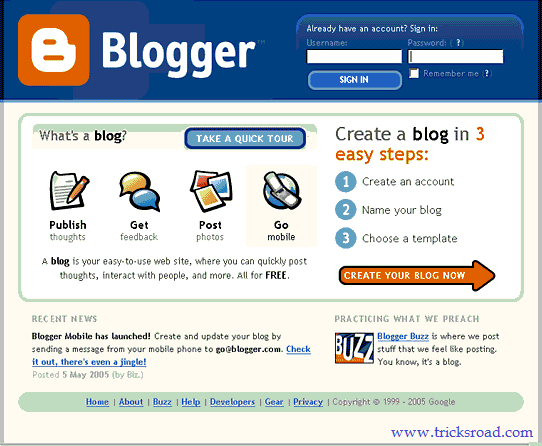
The blog you are reading is on Blogger and I face issues while customizing. That is the reason all my other blogs are on self-hosted WordPress.

Even though you don’t need hosting while starting a blog with Blogger but apart from that everything will be the same. But when you will start using it you’ll find a lot of differences. Let me list a few of those here.

1. The customization is very hard in Blogger and you can’t do all the customization you want.

2. There is no concept of landing pages in Blogger inside a blog. If you want to remove the sidebar from blogger, you can do it but that will be for pages or the whole blog, not the post.

3. There is always a risk that Google may delete your blog without any prior warning and all your work will be lost.

4. You can’t play with the blogging tools as there are not many add-ons available for bloggers. Whereas for WordPress 46k+ plugins are available.

After going through all these points, I am sure you must have decided to go with WordPress.org (self-hosted).

Again, if you want to compare wordpress.com and wordpress.org, wordpress.org will be leading. You can check the below comparison between both.

Difference between wordpress.com and .org
So far, the blogging platform has been selected. Now it’s time to work on the niche in which you will be blogging.

Blogging Niche Selection

I have written a detailed blog post on this topic- 10 best blogging niches to get started!

You can check that blog post for a detailed understanding of the blogging niches. Also, I have seen some people discussing whether they should start a single niche site or a multi-niche site.

Here are my view and detailed analysis of it- single niche vs. multi-niche blog

It is always advisable to start working on the niche which is of your interest. Also, don’t go simply by checking the CPC of keywords. Some people find few keywords having CPC USD 100+ (e.g. Mesothelioma) and start working on it and end up getting nothing.

Domain Name Selection

The domain name is also one of the important factors in blogging. Your domain name should be easily readable and should not contain any name violating the trademark.

You should follow our articles on the domain name- How to select a domain name and cheap domain name registrar in the world.

Here are some of the best practices for domain name selection-

1. Choose a name that is relevant to your website
2. Keep it short
3. Should be easily pronounceable and memorable
4. Avoid using numbers, hyphens, etc. in the name
5. Should not have trademark names (like Google)
6. Prefer the TLDs like .com/.net/.org

You should know these things before starting any blog and I am sure after finishing this post, you can answer all these questions.

Choose reliable hosting

Once you’re done with the above steps to start a WordPress blog from scratch, it’s time to work on hosting.

Hosting is one of the most important parts of the website life cycle. Your hosting must have the following qualities.

1. High quality and fast processing server
2. 24x7 dedicated support- especially the technical support
3. Should be cost-effective
4. Must have high uptime to ensure your site is up every time
5. The company should take backup regularly and provide the copy/restore when required
6. Should be interactive and can accommodate the third-party apps

After going through all these features, you may shortlist few hosting provider companies and go ahead with them.

I personally support BlueHost for WordPress hosting. There are many reasons behind this including the fact that BlueHost is the officially recommended hosting from WordPress.

Apart from this, free domain, instant support, uptime, and server performance are the qualities due to which I recommend BlueHost for WordPress blog hosting. You can check our BlueHost Review for further details.

The good thing with BlueHost is the free domain for a lifetime. Till the time, you’ll be with BlueHost hosting, the domain will be free for you. If you will buy a domain separately, it will cost you around $10-$15 per year.

Buy a WordPress Hosting from BlueHost

In this section, I will be talking about how to buy WordPress Hosting from BlueHost. You can also check the BlueHost hosting review if you need any further details.

Click here to buy WordPress Hosting from BlueHost at a Discounted price

Now open BlueHost and follow this section to buy hosting from BlueHost. Buy this you will be joining the community which powers more than 2 Million WordPress websites.

Note: At TricksRoad, we believe in transparency. If you will buy from the above link, I will get a small amount of commission without any extra cost to you. Even you will receive a discount if you will buy from this link 😊
 
BlueHost
Once you will click on get started now, it will take you to the plans page where different plans will be listed as shown below.
BlueHost Plans
If you are just starting with the WordPress blog, I will suggest you go through their basic plan at just $3.95 per month. Here you will be allowed to host one website.

If you need to host more websites, plus or prime plans will work best for you. The best thing is currently the prime plan is at the same cost as the plus plan.

Select the plan which suits you and you will be redirected to a page where you will be asked to enter your account details, demographic information, and the payment summary.

Here, BlueHost will ask you to claim the free domain. If you are ready with the domain name, you can claim else you can select the option to claim later.

By default, BlueHost will add extra add-ons to your cart. Make sure you’re unchecking those as below.
BlueHost Plans

120+ Best Blogging Tools to Grow your Blog- [2023 Edition]

By Ashutosh Jha → Thursday, November 23, 2023
With the advancement of technology, almost made our work damn easy. No matter what you are doing, you will find such tools which can make your work easy.

The same also applies to Blogging. It’s no more a secret that Blogging is now a business and people are making Millions out of it. It is an art and with the help of tools, we can make this art run and shine.

Best Blogging Tools to Grow your Blog
Just for an example, a few years ago, if we had to build links, we type the keyword in the search engine and check on which all sites we can make the links but what about now?

With the help of link building tools, we can get the list of all the sites, their status, ranking or say all the details about it in just a click. Isn’t Blogging tools have made Blogging easy?

There are many such best blogging tools those are making our way easy and we should use those as and when required. To get those on a single page, I have compiled the epic list of best blogging tools to grow your blog and business.

Personally, I have used many of these while others are based on the expert’s recommendations. You can use these tools without a second thought and can make your blog run like a business.

The Ultimate List of Best Blogging Tools

Here is the list of 120+ Best Blogging Tools for your reference. I have categorized all these tools in different sections so that you can pick the one which you like the most.

This post is going to be bit long so a cup of coffee is highly recommended :)

Blogging Platforms

WordPress: It is the leading CMS to start with blogging. WordPress is very popular as it has over 40k plugins to your required work easily.

Blogger: After WordPress, Blogger is widely used. It is a free platform and has good features available. You can start a blog on Blogger platform in minutes.

Joomla: Joomla is also a leading platform to start blogs and websites. There are several top sites hosted on Joomla. Drupal is also one good alternative of it.

Tumblr: recently it has become one of the top choices of blogger. Especially bloggers use Tumblr to rank their money making sites. You can find high quality expired Tumblr domain and can rank site easily.

Desktop Blog Editors

Evernote: I use this tool to make quick notes and it’s available via cloud syncing.

Desk: This is a paid tool for Mac OS and is a distraction free writing tool. Very useful for blogger using Mac.

Open Live Writer: This is one of the best tools to write and publish directly from the tool itself. Here once you will sync your blogs in the Open Live Writer, you can write and publish directly. The only this is, it works only for Windows and won’t work on Mac OS.

Blogo: Blogo is a desktop editor where you can do offline writing and directly publish to your WordPress blog from the dashboard. It is again only for Mac.

Blog Post Title Generator

I would recommend you to please check our detailed post of Best Blog Title Generator for details. Here is the list of Blog Post title generator.

• UpWorthy title generator: This is a viral title generator and will help you a lot. Great for a story like a site.

• Potent C idea generator: Will work both as a content idea and title generator for your next post

• Headline Analyzer: This is by Coschedule and is one of the best blog post title generator tools I have come across. Here you just paste whatever is in your mind as the title and it will give you the complete analysis as should you use it or not.

• Emotional Marketing Value Headline Analyzer: It checks the emotional marketing value of a title. The higher the EMV score, the better it will perform on social media channels.

• TweakBiz title generator: This is another great tool by Tweakbiz and helps you a lot to find the idea for the next blog post title.

Proof-reading tool

Grammarly: One of the best tools available in the market to check grammar today. It is available in both free and paid segments.

AtomicWriter: A good alternative to Grammarly. Again available as free and paid. For advanced checking, you will have to buy this tool.

Check out our Top Grammarly alternatives to learn about other proof-reading tools.

Ginger: Ginger is a free online proofreading tool to check the grammar and spelling and help you to write error free articles for websites and blogs.

Stock Image for Blog

Google Images: The best place to find the image for your blog post. But be careful while choosing it, especially if you are not getting credit to the owner of the image. They may file DMCA and you will be in huge loss. You can check our article on How to Find Royalty Free Images in Google.

Flickr: Use advanced search to find images with a creative common license.

WP Image Suite: It is a paid WP plugin to find the image. This tools searches over 9 image sources and will give you the wide option to get the images. Also, you won’t have to provide the credit if you are using this plugin.

Canva: It is a graphic design software where you can design images and banners for your site.

Unsplash: It is a great tool to find the HD images. It’s a free source to get high-quality images.

Content Ideas

• Blog Comments: Get the ideas for the next blog post from the comments done by your readers.

• Google Trends: Check the trending topics of the current time or you can also search for the trendy topics based on your keyword.

• Ask your readers: You can also send an email to your subscribers and can ask what they want you to write. This is one of the best ways to get content ideas. You can also create a poll on your blog for the same.

• Social Media: Post some topics on your social media wall and ask your followers to suggest what they want you to write.

BuzzSumo: You can enter a website or topic and the tool will show you the most engaged topics and content shared on that.

Quora: One of the best Q&A sites where you can get unlimited content ideas. Just enter the keyword in the search box and you will get thousands of topics to write on.

Blog Submission Sites like Kingged: You can also check sites like Kingged where others share their posts and so you can get an idea what to write.

Offline Reader & Content discovery

Pocket: One of the most productive tools I am using. You can save the web pages which you want to read later or for reference purposes. You can read it later anytime.

Feedly: Subscribe to any blog feeds or search for your interested topic to discover new blogs to subscribe to.

Visitor Stat & Analytics 

• Google Analytics: The best and most free tool when it comes to analytics. Given by Google, it will show you the complete traffic details, their behavior, real-time data, keywords, kind of traffic and much more. It is a must have tool and must trusted analytics tool that you must have.

How I started a Niche Blog and earning $60/month in 4 Months [Case Study]

By Ashutosh Jha → Saturday, April 24, 2021
A niche blog is still in demand and it still works!

Recently I started a niche blog and within just 4 months, it started earning around $60 per month with no much work.

In this article, I am going to talk about how to start a niche blog and earn $60 per month with almost no time. I will be sharing the step by step procedures I followed to earn and you can do the same.

How to start a niche blog
I will be sharing the revenue report, traffic report, comparison, and more but not the URL due to obvious reasons.

Earning of a Niche site in Jan 2020

We collaborated with Ezoic to run the Google ads and so, I will be sharing the earnings report from my Ezoic dashboard. I have written a review of Ezoic here and if you want, you can also join Ezoic by following this link.

In January 2020, we received a total of $59.08 after the deduction of publisher charges and this was pretty good looking at the site age. Here is the daily distribution of earning-

Earning of a Niche site in Jan 2020

Earning of a Niche site in Feb 2020

In February 2020, we earned a total of $42.75 after all the deductions. The earning was less because we faced some issues with ad integration and hosting. And you can see in the below image that we didn’t earn after 22nd Feb.

Earning of a Niche site in Feb 2020

Earning of a Niche site in December 2019

In December 2019, we earned a total of $54.85. Although we were thinking that it will cross $75 but later due to year-end, it didn’t meet the target. Although now we are working to make it earn at least $100 per month. Here is the screenshot of daily earning in December 2020.

Earning of a Niche site in December 2019

Now as you saw the earning report of December 2019, Jan 2020, and February 2010, it’s time to show you the traffic report of the site.

Traffic report of a niche site in December 2019

In December 2019, we received a total page view of 8862 with 6062 users. This comes with 1.23 pages per session. We aim to increase the page interlinking and take page/session to at least 2 pages per session. We are working on this and hopefully, we will be able to get there soon.

Traffic report of a niche site in December 2019

Traffic report of a niche site in January 2020

In January 2020, traffic increased a bit and we crossed 10k page views with a total of 7056 users. We saw a traffic spike of around 17% in January. This majorly happened as we published a few new contents along with the less holiday in January compared to what we had in December.

Traffic report of a niche site in January 2020

The page per session also improved a bit and we reached 1.26 pages per session compared to 1.23 what we had in December 2019. But still, this is far below our target 2 pages/session.

Another problem we are seeing with the traffic is the bounce rate. Almost every month we are seeing the bounce rate going above 80%. This is something we have to work on and we are focusing on for the next few months.

If you’ll look for the average bounce rate of blog pages then it is between 70-90% and our blog fits there.

Bounce rate by industry
And we aim to lower the bounce rate by less than 70% for now. Here are some of the top techniques we are following to decrease the bounce rate of the blog-

  1. We are working to redesign the site to make it a little more appealing. For this, we are evaluating some of the Google AdSense optimized themes. We will share which one we finally have gone through.
  2. Instead of posting some content in the form of a blog page, we are working to create those as a landing page. For this, we are taking help from the Thrive landing page creator. There are many WordPress landing page creator plugins which you can review for the use. Some of these are free while others are paid.
  3. For the next few months, we are also focusing on creating some videos for the blog and we are expecting the bounce rate will improve from this.

Traffic report of a niche site in February 2020

February 2020 was even better for our site in terms of the traffic and we crossed total pageviews of 11.5k. So, our pageview increased by around 9%. But our page per session and bounce rate showed some decline.

Traffic report of a niche site in February 2020
As of now, our target in terms of the traffic is to cross 15000 page views per month. We hope in a couple of months, we will cross this target with an earning of $75 per month. We will update this post, with the updates and our milestones.

How to start a niche blog and make money?- Our story

Here are the exact steps I followed while creating a niche site. If you’re also looking to start a blog, you can follow these exact steps to get started. Overall, if I have to summarize the blog life cycle, then this image can be one of the best suited.

blog life cycle

#1 Niche Selection

Many say niche selection is the most difficult or at least one of the hardest jobs to execute while starting a blog.

Even I second that and should be chosen wisely. Earlier I have written a detailed post on a profitable blogging niche that you can choose as a reference.

The one that I selected was on the movie download. Although this is a heavy crowded site but still a lot of options for improvement. The major reason we selected this niche was-

  • Most of the movie downloading sites are illegal and those gets closed very quickly due to piracy
  • Movie downloading sites get popular in no time
  • And so, when a popular movie download sites get closed, people start looking for alternatives and this is where we worked

Although this is not an easy niche to work with as you have to keep an eye on the links and sites you’re using. For example, if you have listed site-A as the best downloading site and the next day that site got banned then you will have to update your list asap. This will help the user not to land on the non-working sites.

#2 Creating a WordPress site

The second step was to create a WordPress site on it. Although TricksRoad is on Blogger I start new blogs on WordPress due to more flexibility. And this niche site also I started on WordPress itself.

If you’re new to blogging and don’t have much idea on how to start a WordPress blog from scratch, you can follow the guide.

#3 Domain Selection- EMD vs PMD

Well, one thing that I have experienced is EMD (Exact match domain) no longer works!

For example, let’s say if you’re looking to start a blog on the main keyword- “dog food” then the EMD will be something like dogfood.com or dogfood.net or similar.

Means, the domain name is nothing but your keyword. This is called an exact matched domain name or EMD. Earlier (back in 2010 or 2012) this was working like superman in ranking especially for the niche site. But now search engines are way too smart and EMD doesn’t much impact the ranking in the search engine.

In late 2012, Google announced that it will change the low-quality EMDs and was announced by the then CEO of Google.

EMD Announcement by Google CEO
But still, if worked correctly, EMD adds a slight advantage over the generic domain name. There are many checklists while selecting the best domain name and you should follow those. Also, there are plenty of cheap domain name registrars which you can check for buying a domain name under $1.

In my case, I didn’t find an EMD and so I moved to PMD which stands for the partial matched domain. That means, if my main keyword is dog food then PMD will be something like dog-food.com, dogsfood.com, bestdogfood.com, dogfoodhq.com, etc.

#4 Hosting- Sharing hosting vs dedicated hosting

The next thing I want to talk about is hosting as many important factors like speed, uptime, etc. heavily depend on the hosting. I have talked a lot about hosting earlier and so, I am just sharing the references here.

I already had unlimited shared hosting and so, I directly hosted on the same without buying any new hosting for that niche site. If you’re a complete beginner then you may start with the free web hosting providers as well. Few things those you should look for while selecting the best hosting solutions for you-
  • Uptime
  • Technical support
  • Speed of the network
  • Security & backup solution
  • Pricing & renewal pricing
Usually, you can get a decent shared hosting at around $1-$2 per month. I recommend not going with dedicated hosting for the starters.

#5 WordPress theme selection

I am not a big fan of frequent theme selection and stick to the one for a longer period. There are many premium and free AdSense optimized themes that you can try.

As my niche blog was majorly focusing on the AdSense and so, I started with the Voice theme of Meks. You can buy this from ThemeForest which costs $69. It’s an amazing & multi-purpose theme and I highly recommend this.

WordPress theme selection
It’s not always required to buy a theme, you can also keep on using any free theme. And further use any plugin for the ads, the choice is yours!

Just make sure the site is optimized for all the devices- Desktop, Mobile, and Tablet. I receive around 17% mobile traffic which I expect to grow shortly and so, the site should be able to manage such users.

Traffic by device tricksroad

#6 Important WordPress Plugins

The main reason why I like WordPress most is due to the thousands of WordPress plugins available. You just name a feature and there will be many free and premium WordPress plugins available.

This has always been debatable on how many plugins you should use for your blog. I don’t go by number and instead just install when needed.

As of now, I am using 15 WordPress plugins for this niche blog for different purposes.

must have wordpress plugins
Here is the list of top WordPress plugins I am using in this blog-
  1. 1. Visual composer- for the page creation and landing page creation
  2. 2. Contact Form 7- For the contact form
  3. 3. Meks Flexible Shortcodes- for shortcuts like column, background, etc.
  4. 4. Easy Table of Contents- for a table of contents and is highly recommended
  5. 5. Meks Easy Ads Widget- Comes with the theme for the ads. If you will be using Ezoic, this is not required.
  6. 6. Meks Simple Flickr Widget- Comes with the theme to display your Flickr photos inside WordPress widget. Not compulsory to have.
  7. 7. Meks Smart Author Widget- Comes with the theme to display the author's image. Not compulsory to have.
  8. 8. Meks Smart Social Widget- Comes with the theme for displaying social media icons.
  9. 9. Meks ThemeForest Smart Widget- Comes with the theme and help you display ThemeForest items on your blog like affiliate banners
  10. 10. WP Review- Free plugin for the review of any page or posts. Highly recommended
  11. 11. Mighty Classic Pros And Cons- Another free and highly recommended plugin to show a pros and cons table
  12. 12. Thrive Architect- It's a premium plugin to design the landing page and other elements quickly
  13. 13. W3 Total Cache- It's a freemium plugin for Search Engine (SEO) & Performance Optimization (WPO) via caching. The free version will be sufficient for you
  14. 14. All in One SEO Pack- The WordPress SEO plugin which helps you write the title, description, evaluate keyword, and more. An alternative is Rank by Math and Yoast SEO plugin.
  15. 15. WPBakery Page Builder for WordPress- Free page builder plugin to create the elements. I have stopped using this after I installed Thrive Architect.

#7 Keyword Research

Once your blog is live, the next thing you might want to look for is the content. But before that, I would like to tell you about keyword research.

Don’t start with a random topic as this is a niche blog and you need a proper plan. for this keyword research will be highly helpful to you.

You can take the help of any keyword research tools like Ahrefs, Semrush, Google Keyword Planner, etc. to do keyword research. Even you can take the help of search volume display Google chrome extension like keyword surfer for this.

So, now let’s say you finalized the following 2 keywords for your blog (I would at least recommend going with 10+).-

  1. 1. Dog food
  2. 2. Purina dog food

Now look for the LSI keywords related to these main keywords. To get the Latent semantic indexing (LSI) keywords, you can take the help of Google search. LSI keywords are those keywords that people use with the main keyword.

For example, when you will search for “dog food”, you will find a list with the heading “Searches related to LSI keywords” at the end of the search page. Those are nothing but the LSI keywords. You should use these LSI keywords in the content as well along with the main keywords to attract more traffic.
LSI keywords
optimizing your content for these LSI keywords will help you rank for these keywords as well. And this will help you get more traffic.

#8 Content- Posts & Pages

After you have finalized your main keywords and LIS keywords, it’s time to draft the content. First, create some important pages like-

  1. 1. About
  2. 2. Contact
  3. 3. Privacy Policy
  4. 4. Disclaimer

These are the 4 mandatory pages one must create. And then start creating the main content. Initially, I would recommend you write a few evergreen contents. The number of words also impact the ranking for the keyword and research shows the below-

content length vs ranking
At least while starting, create some posts with 2000+ words and later you can keep adding 1000+ words. Make sure the content is making sense and not anything just for the sake of completing the words. Use your main keywords in the content, URL, headings, description, image meta tag, etc. Also, use the LSI keywords as and where required and suitable. Don’t make the keyword overcrowded so that it will look over-optimized for the search engines.

Research shows the below for the perfect keyword density-

Google keyword density
I kept the keyword density between 1-2%. This means in a 1000 words article, I used 4-5 times main keywords and 4-5 times a combination of long-tail keywords.

While writing the content, take care of your audiences as well. For example, I am getting maximum traffic from the age group of 25-34 and so, the content I am aligning is more inclined towards such groups.

Tricksroad traffic by age group
Another technique that I followed while writing the content is to personalize it. Similar to what I did for age, I also followed the gender. As my niche site was on movie niche and so, the taste of movies varies from age group to gender. I get 70% male traffic and 30% female traffic. And so, the content on the site is also distributed similarly.

Tricksroad traffic by gender
As I was working on the movie download niche and so, most of my content was related to alternatives. For example, putlocker is one of the top movie download sites and so, I used to write like top putlocker alternatives and similar articles. And as I was making the article based on data like on age groups, genders, location, etc. and so targeting was a little easy.

#9 On-Page SEO

After you have added the content, it’s time to optimize the content. This comes in the on-page SEO part where you don’t need anything extra and just optimize the existing content as per the ranking guidelines. I have written a mega guide on the on-page SEO optimization technique and I would recommend you going through that. For that niche blogs also, I used the same techniques listed here.

#10 Social Media pages & Social Signals

The next thing that I did was to create the social profiles for the blog. Although for the niche blog, you may not use it a lot it’s required to look genuine both from a user perspective as well as a search engine point of view.

I created the following profiles on social media-

  1. 1. Facebook page
  2. 2. twitter page
  3. 3. Instagram page
  4. 4. Pinterest page
  5. 5. Linkedin Profile
  6. 6. YouTube channel

Remember, most of these sites give you a backlink also which will eventually help in off-page SEO.

After I created the profiles, I bought some social signals like Facebook likes, Twitter followers, and some YouTube views. To buy these, I ordered around 1000 Facebook likes, 500 Twitter followers, and 5000 YouTube views. This I simply bought from Fiverr.

Although these are not the best but to start with, it’s decent. Just make sure you are not buying the Chinese likes or followers.

#11 Link Building: Off-page SEO techniques

This was the tricky and hardest part. After getting some social signals, I kept on adding the content and started interlinking. After keeping the site for around a month, I started building links and followed the following techniques for the same-

1. Comment backlink

To keep the backlink profile look natural, I started doing some blog commenting. I did it manually and found a success of around 60%. That means, if I commented on 10 blog posts, 6 of them were approved. But remember, usually comment backlinks are no-follow backlinks but still useful. Here is the list of 25 commentluv enabled sites to get comment backlinks.

2. PDF submission sites

The next thing I did was to submit some PDFs to the PDF submission sites. This way also, I created around 50+ links. Please note that you don’t create all the links in a day. Keep it diversified so that it will look natural and will avoid the Google penalty. I followed around 10 links per day.

3. Guest posts

Later on, I bought around 15 guest posts that were DA 20+. For this, I took the help of Risement and they outreach for us and delivered in 15 days. So, we got 15 very high-quality dofollow backlinks from those 15 guest posts. If you want, you can also connect with them at risementmail@gmail.com.

These were the three techniques I followed to get the backlinks for the site. By the time, I started doing guest posting, I found traffic was increasing and the site was ranking on the first page for a couple of keywords but of low searches.

#12 Signed up for Ezoic

Once the traffic reached around 5000+, I thought to start monetizing it. Although there are many techniques to earn from the blog, I followed the AdSense one due to the niche selected. I already had an account with Ezoic for my other blog and so, I just added this site to my account and integrated the site for the ads to serve.

Within a day, the ads were visible to the site and I started earning from it. As of today, the site gives between $1-$4 per day depending on the traffic.

Conclusion

These were all about how I started a niche blog and started earning $60 per month with almost no work. Initially, I worked but later the site is on auto-mode.

So far, I have published around 15 HQ articles and 10 normal articles. I have been a little slow these days but have planned to put at least 1 good article per week.

These are the exact steps I followed and you can do so. If you’re also looking to start a niche blog, just follow the guide and comment below, if you need any clarification.

I hope you found this guide on how to start a niche blog useful. If you did, please share it with others as well. Here is the video tutorial of the same-


Top 6 Grammarly Alternatives

By Ashutosh Jha → Thursday, December 3, 2020
As a quality, the article should be error-free. For this, you can use some proofreading tools like Grammarly or others. But if you are not much satisfied with Grammarly than this Grammarly alternative post is for you. Here in this post, I am going to list a few top Grammarly alternatives which you can use to write a quality article.

Grammarly Alternative

Grammarly is an online proofreading tool using which you can write an error-free article and can make quality content that will be loved by the reader and search engine both. You can check my Grammarly review here.

But there are a large number of people who don’t like Grammarly may be due to some factors like-

• The cost is high. The monthly cost is $29.95
• Maybe not satisfied with the quality they produce

So, if you are looking for some other options for the proofreading tool, then here are some top Grammarly alternatives to writing high-quality articles.

Grammarly Alternative: Top 6

Here are the 6 software like Grammarly which you can use in daily practice for error-free content. Some of these are free Grammarly alternatives while others are paid. So let’s start with software like Grammarly.
1. Ginger
2. GrammarBase
3. PaperRater
4. SpellCheckPlus
5. Slick Write
6. Writer

Now let's discuss all these Grammarly alternatives one by one in detail.

1. Ginger

Ginger is software like Grammarly and is a solid competitor of Grammarly in terms of market and features.

Ginger is a free online proofreading tool to check the grammar and spelling and help you to write error-free articles for websites and blogs. Below are some of the features of Ginger.
Grammarly Alternative

Basic features of Ginger are completely free while if you want to use their advanced features like “Text Reader” and “Personal Trainer” then you can go with their premium plan which just starts at $4.10 per month and is far much less than Grammarly.

2. GrammarBase

GrammarBase is another solid alternative of Grammarly which is a premium tool and checks the following stuff while scanning your articles for error-

Grammarly Alternative

  • Grammar
  • Punctuation
  • Style
  • Plagiarism
  • Contextual Spelling


So as you can see from the above features, it not only checks for the error in the content but also for plagiarism which ensures your content is unique and will not get affected by any search engine updates.

The cost of GrammarBase is $15 per page which can’t be good for those who are looking for the cheap Grammarly alternative.

3. PaperRater

If you will talk about the best Grammarly alternative, I would prefer PaperRater due to many reasons-

Grammarly Alternative

• Basic plan is completely free for up to 5 pages
• Premium plan just comes at $7.95 per month which is far less than Grammarly.

Here are some of the features of PaperRater-

  • Plagiarism Detection
  • Auto Grader
  • Spelling and Grammar Check
  • Style and Word Choice Analysis
  • Readability Statistics
  • Title Validation
  • Vocabulary Builder tool

4. SpellCheckPlus

This web-based tool allows you to put your text in their content checkbox and then it will highlight all the mistakes like spellings, grammar, and many other things which you can correct in order to make a better article.
Grammarly Alternative
Spell Check Plus is a free online tool with a limit of 250 words; however, the full access can be accessed by registering to the portal.

5. Slick Write

Slick Write is also one of my favorite tools to check grammar and spelling online. It is powerful to check your writing for grammar errors, potential stylistic mistakes, and other features of interest. Below are some of the features of Slick Write-


  • The grammar checker is lightning fast
  • It provides customizable feedback to suit your audience and style
  • Add impact to reports
  • Improve your grades
  • It's free


6. Writer

Lately, the Writer is being called as best Grammarly alternative to business. It is an AI business writing assistant helping the enterprise write error-free and impressive content, email, and other content.
Qordoba

The writer is available for Google Chrome, Google docs, and Microsoft Word which fulfill almost all kinds of writing needs. The best thing about Writer which makes it even better than Grammarly for enterprises are-

  • You can build your own custom style guide and white label it
  • Check your content against your organization's style guide
  • Brand voice alignment which is very important in communications
  • Gender bias flagging
  • Qordoba follows SOC2, security, and HIPAA guidelines as well

The Writer provides two pricing structure and their starter plan costs $49 per month where 5 users are included and $9 per will cost for additional users. They also offer a 14-days of free trial which you can use to test the solution. There is no credit card required to avail of the free trial.

Conclusion


These were some of the best Grammarly alternatives. You can use any of these tools if you are looking for software like Grammarly. Some of these are a free Grammarly alternative while others are paid.

Which Grammarly alternative you liked most? Which one you use to write error-free articles?

16 Best AdSense Optimized WordPress Blogging Themes

By Ashutosh Jha → Thursday, May 21, 2020
As you have searched for Best AdSense optimized WordPress Themes, you must be either thinking to start earning online or increasing your revenue to few folds. Definitely like we look for SEO optimized WordPress themes. Similarly, we should also use AdSense optimized WordPress themes for better output.

Ultimately you are not doing any extra work and in response getting your income multiple folds. Definitely, you can use AdSense plugins for WordPress but there are many AdSense optimized WordPress themes, and you can use those directly instead of installing many plugins which will just increase your blog loading time.

These themes have intentionally designed to get you more CTR and hence with the same traffic your AdSense revenue will get increased. You can also check our 12 super tricks to increase AdSense income.

These Best AdSense Optimized WordPress Themes provides great CTR and have enough spaces to place your ads and even in the demo of themes, it will show you, what are the best places to place your AdSense ads for maximum revenue?

In this article I have gathered around 16 Best AdSense optimized WordPress themes for you so that you can increase your AdSense revenue. Some of these themes I have used for my niche blogs while others are based on the user's review and what company claims.

Best AdSense Optimized WordPress themes for better earning

Here is the list of best WordPress theme for Google AdSense. If you are not using AdSense optimized WordPress theme and your primary source of income is Google AdSense, I would suggest you move as fast as possible to any of these best WP themes for AdSense.

1. Newspaper


This is the perfect theme I found after many times and I am really loving it. No matter if you are running a news site having multiple categories like Business, Entertainment, Technology, etc. or a simple blog, Newspaper theme is the perfect choice for you.

It is a WordPress AdSense theme created primarily for newspapers, news and publishing websites but definitely due to its highly customizable feature, you can use it for any site.

It is not only AdSense optimized WordPress theme but also SEO optimized theme for great use. It has separate space for ads, videos, social signals and much more which make your job easy. The design of Newspaper theme is very eye pleasant and will attract your visitors for sure.
Price: $59

How To Create A Free Blog On BlogSpot Platform Just In Few Minutes

By Ashutosh Jha → Wednesday, May 20, 2020
Having a blog of your own is a great thing as you can share anything you like and if you are among the few people who have the dream to be your own boss and want to live through online earning, blogging is the best way.

Today I am going to show how you can create your own blog just in few minutes and that too without spending a single penny. My favorite is to have blog on custom domain but initially you can try on blogspot. So let's start with how to create a free blog on BlogSpot.


There are many blogging platforms where you can create a blog for free but among them I feel BlogSpot as best. Few others are –

  • Wordpress.com
  • Pen.io
  • Anchorcms.com

But many newbie who doesn’t want to spend money initially and would like to enter into the fabulous blogging world, BlogSpot.com is the best option. And once you are good in blogging either you can choose a custom domain for your blog or you can move the blog to self-hosted platform also.

BlogSpot let you create a free blog but it has few limitations but as a beginner it will not affect you. So for a starter it’s a good idea to create a free blog and get the hitch of blogging.

Note: BlogSpot.com blogging platform is a Google product which enables you to create a free blog with the blog extension blogspot.com or blogspot.in and all the images are getting hosted through Picasa, which is also a Google product.


This post is dedicated to the people who are new to the blogging world and want to start their own blog where he can continue with their dream. So now let’s come to the points. Below I am going to explain the step by step procedure to create your first blog.

Step by step guide to create a free Blog on BlogSpot

To create your first blog, just go through the www.blogger.com url and login with your Gmail credential. If you have not registered with Gmail, just do it for free and it’ll not take more than 2 minutes. Once you are logged in to your blogger.com, it will ask for your identity as would you like to use Google+ profile or want to set a limited identity for blogspot. Here I would suggest you to go with the Google+ profile and then continue. And you will get the screen something like below-


Step 1: The above image shows that you don’t have any blog with you right now. So let’s create it. Click on the “New Blog” button showing on above image and give the title for your blog and the domain name that you want for your blog and click on create it.


Step2: Now you have just registered a domain with BlogSpot but your blog is not ready. At this time you will be at the blogger dashboard (this is the backend of your blog). Now either you can continue with the limited blogger basic templates or choose your own templates from the net. There are many good looking templates are available free of cost for blogger.

Recommended: How to select an effective template for your blog

Now download any template for free. But the premium template is always the best due to its feature. You can get a premium template free of cost just by subscribing us. After subscription of TricksRoad, just drop us a mail and will send you a free premium template and will also guide you, in case of any difficulty.

So for now, select any template from the internet and install it. Go to the dropdown in the below image and select “Template”.


Now go to the top right corner and select Backup/Restore option. A pop up window will get open here. Now browse the xml file of your template and upload it. With this you are done with the template installation.


At any points of time you can view your blog, just by clicking “View Blog” button at the top of the dashboard.

Step 3: Now first create few pages for your blog like About us, contact us etc. For this go to “page” option and select “Create A New Page”. Give the title and content and then publish it.


Step 4: Now create few posts for your blog. Just go to the post option and create a new post. Write the content and publish it. So now your blog is ready. If you want to add few gadgets like subscribe option, popular posts etc. follow few more steps.

Step 5: Adding Gadgets:

Go to the “Layout” section.


And click on Add Gadgets. To add subscribe option, select the “Add a gadget” from top right and from a blogger list, add subscribe option. Similarly do for other gadgets also (a guide to customize the template will be available with the template).

Now with this, you have created a good blog for you and you are having few posts also. Add some more posts and do some basic SEO like bookmarking. After this you will be getting few initial traffic. Then apply for the Earning.

Earn from blog:

Go to Earning tab and select AdSense.


Signup for the AdSense and once your account will get approved, you will be earning from your blog.

Recommended: 12 killer tips to earn more from AdSense

So friend this was all about creating your first free blog. This was for those readers who don’t have a blog and want to create one. So just follow the above steps and get a blog right now. The whole process won’t take more than an hour.

If you liked this how to create a free blog on blogspot post, please don’t forget to share it on Facebook, twitter and do subscribe our newsletter for the updates and freebies.