Browsing "Older Posts"

Browsing Category "Blogging Resource"

120+ Best Blogging Tools to Grow your Blog- [2023 Edition]

By Ashutosh Jha → Thursday, November 23, 2023
With the advancement of technology, almost made our work damn easy. No matter what you are doing, you will find such tools which can make your work easy.

The same also applies to Blogging. It’s no more a secret that Blogging is now a business and people are making Millions out of it. It is an art and with the help of tools, we can make this art run and shine.

Best Blogging Tools to Grow your Blog
Just for an example, a few years ago, if we had to build links, we type the keyword in the search engine and check on which all sites we can make the links but what about now?

With the help of link building tools, we can get the list of all the sites, their status, ranking or say all the details about it in just a click. Isn’t Blogging tools have made Blogging easy?

There are many such best blogging tools those are making our way easy and we should use those as and when required. To get those on a single page, I have compiled the epic list of best blogging tools to grow your blog and business.

Personally, I have used many of these while others are based on the expert’s recommendations. You can use these tools without a second thought and can make your blog run like a business.

The Ultimate List of Best Blogging Tools

Here is the list of 120+ Best Blogging Tools for your reference. I have categorized all these tools in different sections so that you can pick the one which you like the most.

This post is going to be bit long so a cup of coffee is highly recommended :)
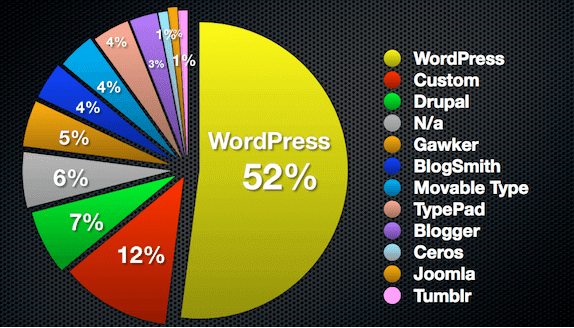
Blogging Platforms

WordPress: It is the leading CMS to start with blogging. WordPress is very popular as it has over 40k plugins to your required work easily.

Blogger: After WordPress, Blogger is widely used. It is a free platform and has good features available. You can start a blog on Blogger platform in minutes.

Joomla: Joomla is also a leading platform to start blogs and websites. There are several top sites hosted on Joomla. Drupal is also one good alternative of it.

Tumblr: recently it has become one of the top choices of blogger. Especially bloggers use Tumblr to rank their money making sites. You can find high quality expired Tumblr domain and can rank site easily.

Desktop Blog Editors

Evernote: I use this tool to make quick notes and it’s available via cloud syncing.

Desk: This is a paid tool for Mac OS and is a distraction free writing tool. Very useful for blogger using Mac.

Open Live Writer: This is one of the best tools to write and publish directly from the tool itself. Here once you will sync your blogs in the Open Live Writer, you can write and publish directly. The only this is, it works only for Windows and won’t work on Mac OS.

Blogo: Blogo is a desktop editor where you can do offline writing and directly publish to your WordPress blog from the dashboard. It is again only for Mac.

Blog Post Title Generator

I would recommend you to please check our detailed post of Best Blog Title Generator for details. Here is the list of Blog Post title generator.

• UpWorthy title generator: This is a viral title generator and will help you a lot. Great for a story like a site.

• Potent C idea generator: Will work both as a content idea and title generator for your next post

• Headline Analyzer: This is by Coschedule and is one of the best blog post title generator tools I have come across. Here you just paste whatever is in your mind as the title and it will give you the complete analysis as should you use it or not.

• Emotional Marketing Value Headline Analyzer: It checks the emotional marketing value of a title. The higher the EMV score, the better it will perform on social media channels.

• TweakBiz title generator: This is another great tool by Tweakbiz and helps you a lot to find the idea for the next blog post title.

Proof-reading tool

Grammarly: One of the best tools available in the market to check grammar today. It is available in both free and paid segments.

AtomicWriter: A good alternative to Grammarly. Again available as free and paid. For advanced checking, you will have to buy this tool.

Check out our Top Grammarly alternatives to learn about other proof-reading tools.

Ginger: Ginger is a free online proofreading tool to check the grammar and spelling and help you to write error free articles for websites and blogs.

Stock Image for Blog

Google Images: The best place to find the image for your blog post. But be careful while choosing it, especially if you are not getting credit to the owner of the image. They may file DMCA and you will be in huge loss. You can check our article on How to Find Royalty Free Images in Google.

Flickr: Use advanced search to find images with a creative common license.

WP Image Suite: It is a paid WP plugin to find the image. This tools searches over 9 image sources and will give you the wide option to get the images. Also, you won’t have to provide the credit if you are using this plugin.

Canva: It is a graphic design software where you can design images and banners for your site.

Unsplash: It is a great tool to find the HD images. It’s a free source to get high-quality images.

Content Ideas

• Blog Comments: Get the ideas for the next blog post from the comments done by your readers.

• Google Trends: Check the trending topics of the current time or you can also search for the trendy topics based on your keyword.

• Ask your readers: You can also send an email to your subscribers and can ask what they want you to write. This is one of the best ways to get content ideas. You can also create a poll on your blog for the same.

• Social Media: Post some topics on your social media wall and ask your followers to suggest what they want you to write.

BuzzSumo: You can enter a website or topic and the tool will show you the most engaged topics and content shared on that.

Quora: One of the best Q&A sites where you can get unlimited content ideas. Just enter the keyword in the search box and you will get thousands of topics to write on.

Blog Submission Sites like Kingged: You can also check sites like Kingged where others share their posts and so you can get an idea what to write.

Offline Reader & Content discovery

Pocket: One of the most productive tools I am using. You can save the web pages which you want to read later or for reference purposes. You can read it later anytime.

Feedly: Subscribe to any blog feeds or search for your interested topic to discover new blogs to subscribe to.

Visitor Stat & Analytics 

• Google Analytics: The best and most free tool when it comes to analytics. Given by Google, it will show you the complete traffic details, their behavior, real-time data, keywords, kind of traffic and much more. It is a must have tool and must trusted analytics tool that you must have.

7 Best Free Online Proofreading Tools for Error-Free Writing

By Ashutosh Jha → Thursday, August 18, 2022
Whether you are a blog writer, columnist, feature writer, or any other type of writer, you have to ensure the quality content which is error-free and easy to read. There are writers who charge $100 for a post while others just get around $2-$3.

Why so much difference?
 
These are mainly because of the writing style, error-free, and data-driven content. While writing the content, we make loads of errors. These errors can be of grammar related or spelling mistakes or incorrect sentence creation etc.

You should do the detailed content analysis before publishing any article to ensure it is free from any kind of errors and mistakes. Usually, there are some errors which you won’t be able to find normally and so you may need to take the help of some tools which will detect such errors and help you to correct.

One such tool is Grammarly and there are many Grammarly alternatives that will help you to detect and correct the errors associated with the content.

As I wrote in my Grammarly review post that, it is a paid tool and the free version won’t much help especially if you are a beginner? So today, I will be sharing some best free online proofreading tools. These are also free Grammarly alternatives and are very useful for beginners who have just started.

So let’s get started with these Free Grammarly alternatives using which you can write an error-free and high-quality content. These free online proofreading tools will help all the writers no matter you are a beginner or an experienced professional.

Useful Free Online Proofreading Tools

Here is the list of 7 best online proofreading tools and software which will help you in your writing journey. These free online proofreading and editing software are available for free but some of them also provide the premium version with more features and customization.

Here are some of the common practice I used to do before publishing any post-

• I take a break after writing the article and proofreading. Usually, I do after a few hours.
• Read thoroughly and do with the cool mind. Better select a place with less distraction.
• Read from the visitors’ perspective
• Keep on editing in real-time. Some people find an error and mark it. After reading the entire article, they correct. But I prefer editing as soon as I find an error.
• Use an online proofreading tool.

Grammarly

Grammarly is trending and highly used online proofreading tool currently. This is a multi-purpose tool that will help you to check and correct any kind of content for any error.
If you will ask me to recommend only one online proofreading software, I will say you to go with Grammarly.

You can check our Grammarly review to know about the tool in detail. This software is a fermium tool which means, you can use it for free with some limitations but the paid version comes with a better result. Also, the tool has a web API, browser extension, and Microsoft Word extension for better editing. You can also check Grammarly alternatives to look for alternative options.

Join Grammarly, it’s free!

Ginger

Ginger is another top grammar checker tool for editing and proofreading the articles. It is one of the best Grammarly alternatives.

It is a free online proofreading software and comes with all the major OS like Windows, Android, and iOS. It has many features like-

• Grammar checker
• Sentence rephrase
• Translation
• Dictionary
• Text Reader
• Personal Trainer and much more…

Link

Polishmywriting

Polishmywriting works in a similar way as Ginger do but it won’t suggest you for the error like a/an, has/have, etc.

It provides a colorful interface where it shows the errors in three different color-

• Red for the spelling error
• Blue for the style suggestions
• Green for grammatical errors

I found this proofreading software most quick compared to any other online proofreading software.

Link

Slick Write

I found Slick Write one of the best online proofreading and editing tools. If you are not in a hurry and want to deliver the quality content with NO mistakes, Slick Write is for you.

It doesn’t only help you to detect and correct the grammar and spelling errors but also helps you to improve your writing skills.

It will also help you to form the correct sentence and will help you with the word variety.

Link

PaperRater

PaperRater is another good tool for online proofreading and has almost similar features that other free online proofreading services provide with an extra feature. It also checks your article title and rates your overall work like your vocabulary, word choice, style, etc.

You just need to submit your content and it will give you and score based on your writing, grammar, content quality, and sentence formation.

Again it is a fermium tool and you will get full functionality and features in the premium version. But the free version is also worth trying.

Link

SpellChecker.net

This is a bit different from what other online proofreading software provides. Using this tool, you can check your article in different languages.

This tool is highly useful when you have to proofread your entire blog. It will check and will suggest the best solutions for the errors found.

Link

Language Tool

It is another new but impressive free online proofreading tool. It is an open-source proof­reading program for English, French, German, Polish, and more than 20 languages.

The tool is available for open office, desktop, Firefox, and Google Chrome. You can paste your content and can get the suggestions for the errors found.

Link

Writer.com

The writer is a leading AI-enabled business writing assistant for business. It helps you write better content which are error-free and which makes an impact. The writer is comparatively new in the segment but due to its algorithm, getting immense popularity. And due to the strong platform, Writer is being used by organizations like HSBC, Twitter, Zoom+, Discovery, Intuit, and more.

The best thing with Writer is, it allows you to create your own rules for editing content across the platform without referring back to the reference document all the time.


Tommy Hyland who is the VP of Marketing at Ascend says- Writer has allowed him to centralize his content style guide and terminology, making it much easier for others across the company to create marketing content that is aligned to our brand. Please note it is a premium tool and only free trial is available.

Here are some of the features of the Writer which you can use regularly-

  • Available for Google Chrome, Microsoft Word, and Google Docs
  • Uses AI to recommend best and find the error
  • You can save your own style and use it anytime
  • Helps you to be consistent throughout the content in the organization
  • Control where the suggestions should show
  • Fully safe and secure

Access Writer

Wrapping it up!


These were some of the best and free online proofreading tools. These free proofreading software helps you to check content for any possible grammar mistakes and also helps you to enhance your writing.

Do check your contents before publishing with any of these grammar checking tools and ensure that it is error-free and easy to read and avoid common blogging mistakes.

Let me know which online proofreading tool you use for content editing?

10 Tips to Reduce Blog Load Time Fast [Detailed Guide]

By Ashutosh Jha → Wednesday, July 6, 2022
Since the time search engines have started giving much importance to the blog load time, it has really become to reduce blog time.

According to a recent Akamai research, the loss of the number of visitors to a site follows the radioactive first order decay from 4.001 seconds to 30 seconds. Immediately after four seconds there is a loss of one-third of the visitors who abandon the site.

So, you can understand the importance of blog load time which does not only affect the SERP but also affect your business. So now it’s you who will have to decide whether to reduce blog time or not. I am sure you will definitely want to reduce blog time.

If you are on Blogger then you have bit less option to reduce blog load time but definitely you have great options to reduce blog load time fast if you are with WordPress. In recent days, mine blog’s blog load time is also bit more but I am working very hard and I am sure very soon I’ll get rid of it.

Here is an interesting research done by moz on how blog load time affects the search engine ranking. The ideal load time for any website should be less than 3 sec. As per Google,
A search result for a resource having a short load time relative to resources having longer load times can be promoted in a presentation order, and search results for the resources having longer load times can be demoted.

So here in this article I am going to take you through the complete stuff about blog load time like how to reduce blog load time fast, how to check blog load time and how to test the web page load time. So let’s start with how to reduce blog load time fast.

How to Reduce Blog Load Time Fast

Here are some of the best tips using which you can reduce blog/website load time quickly. Hope after implementing these tips you would be able to reduce blog load time quickly. Definitely these tips are for all the users no matter on which platform you are like Blogger, WordPress or it is coded HTML. You can apply majority of the tricks and can reduce website or blog load time.

1. Remove Unused Plugins

This is really a great stuff to decrease blog page load time. Usually we have regular practice to install and active too many plugins in our WordPress dashboard. Yesterday, I was checking one of my WordPress site and found around 40 plugins installed and when I checked how many I am actually using then it was just 17 so I removed the remaining. Definitely it will help me to reduce blog load time by at least a second or couple.

Similarly you can do it as well. There is no hard and fast rule to keep a fixed number of WordPress plugins but keep only those which you are actually using.

This is still a matter of discussion that how many plugins you should actually use in WordPress but definitely go for those which you use. Also, if you are not sure about that you can keep those inactive. So for better practice, you should follow the below 2 options.

a. Disable Temporary unwanted plugins

Suppose you have installed a plugin which you need right now and may be in future but you are not using frequently then it is good to disable that plugin once the work is over.

For example, you have installed a plugin to hide backlink and after sometime you don’t want to hide those so you can disable it till the further use. By this practice you can definitely reduce blog loading time.

b. Remove Unwanted Plugin

You should definitely remove those plugins which you are not using and not have any plans in near future as well to use.

Ok…honestly tell me how many of you are really using the Dolly plugin that comes by default with WordPress?

I am sure many of us DON’T. And now how many of us keep it as it is? I am sure many of us. But why? 

Remove such plugins so that your blog loading time can be increased.

2. Use a Fast Loading Theme/Template

Theme plays a major role while reducing the blog load time. You should use the fast loading themes for your blog. You can check my detailed article, how to choose effective template for your blog.

If you are a WordPress user, definitely go for My Theme Shop themes as they have really amazing collections of highly optimized themes. Their themes doesn’t have unnecessary codes or files which increase the blog load time. So definitely go with My Theme Shop WordPress themes.

It is the themes and templates which decides how much your website will convert apart from the blog load time. As said, first impression is the last impression and so theme should make an impact on the visitors.

Many times we find that people use some theme which is good for adsense but not looks cool. You should avoid such scenarios as there are multiple adsense optimized wordpress themes which you can use for both design and adsense earning.

3. Use a Good Hosting

This point is applicable to WordPress and other custom website users. Apart from the plugins and themes, it is the hosting which, majorly affect the website load time. In order to reduce blog load time, you should definitely use a high quality website hosting.

We recommend BlueHost for better speed and up-time. BlueHost really provides amazing services in terms of website loading time, customization, security and many other stuff which can reduce website loading time.

For our users, you can get a free domain with 50% off on BlueHost Hosting. So invest some amount while selecting the hosting and don’t go by considering only money as they harm your site. Here are the average loading time for some of the major hosting companies-

You can also try Siteground hosting. Check Sitegound coupon code discount.

4. Use Optimized Codes

This point must be taken care by custom coded sites with the WordPress and Blogger users. You should have optimized codes if you are making any changes to the themes in WordPress or Blogger and of course in custom HTML design.


Also, try to avoid the inline CSS codes for styling. Instead make a separate style sheet in your file manager (in case you are a WordPress user) or in Google drive or any shared drive (in case you are a Blogger user). This affect a lot when it comes to reduce the blog load time.

As we all know there are three kinds of CSS used-

• Inline CSS
• Internal CSS
• External CSS

All of these are having their own advantages and disadvantages. You can check more details about those here. But for SEO point of view, try to avoid much of inline codes.

The HTML users should use minimal codes that can fulfil your need. Also, you can take help of any external tool to compress your written code. You can take help of Textfixer for such help. I was using this tool when I used to be a web developer :)

Also, there is a plugin called autooptimize in wordpress which helps you to optimize your CSS codes. This is a free plugins and is a great help to keep your codes compressed.

5. Used Optimized and SEO Friendly Images

Here from the word optimized mean, you should use an image which is search engine friendly. Many times we uses may find royalty free images in Google or may be using the free/premium images from stock images sites or the custom images but if we are not compressing or optimizing those images, those are not going to benefit what it was supposed to be.

No doubt images increase the visuals of the web page but should be optimized properly. If you are a WordPress user, you should follow the below three tools before using the updated images in your blog post in order to reduce blog load time.

• Use SmushIt wordpress plugin to decrease the size of the images without losing the quality of the image.

• For PNG images, use TinyPNG to compress without affecting the quality.

• Want to be smarter? Why not? Yes, you can load the images only when users are reaching out to that place else not. You can achieve this using LazyLoad wordpress plugin.

How I started a Niche Blog and earning $60/month in 4 Months [Case Study]

By Ashutosh Jha → Saturday, April 24, 2021
A niche blog is still in demand and it still works!

Recently I started a niche blog and within just 4 months, it started earning around $60 per month with no much work.

In this article, I am going to talk about how to start a niche blog and earn $60 per month with almost no time. I will be sharing the step by step procedures I followed to earn and you can do the same.

How to start a niche blog
I will be sharing the revenue report, traffic report, comparison, and more but not the URL due to obvious reasons.

Earning of a Niche site in Jan 2020

We collaborated with Ezoic to run the Google ads and so, I will be sharing the earnings report from my Ezoic dashboard. I have written a review of Ezoic here and if you want, you can also join Ezoic by following this link.

In January 2020, we received a total of $59.08 after the deduction of publisher charges and this was pretty good looking at the site age. Here is the daily distribution of earning-

Earning of a Niche site in Jan 2020

Earning of a Niche site in Feb 2020

In February 2020, we earned a total of $42.75 after all the deductions. The earning was less because we faced some issues with ad integration and hosting. And you can see in the below image that we didn’t earn after 22nd Feb.

Earning of a Niche site in Feb 2020

Earning of a Niche site in December 2019

In December 2019, we earned a total of $54.85. Although we were thinking that it will cross $75 but later due to year-end, it didn’t meet the target. Although now we are working to make it earn at least $100 per month. Here is the screenshot of daily earning in December 2020.

Earning of a Niche site in December 2019

Now as you saw the earning report of December 2019, Jan 2020, and February 2010, it’s time to show you the traffic report of the site.

Traffic report of a niche site in December 2019

In December 2019, we received a total page view of 8862 with 6062 users. This comes with 1.23 pages per session. We aim to increase the page interlinking and take page/session to at least 2 pages per session. We are working on this and hopefully, we will be able to get there soon.

Traffic report of a niche site in December 2019

Traffic report of a niche site in January 2020

In January 2020, traffic increased a bit and we crossed 10k page views with a total of 7056 users. We saw a traffic spike of around 17% in January. This majorly happened as we published a few new contents along with the less holiday in January compared to what we had in December.

Traffic report of a niche site in January 2020

The page per session also improved a bit and we reached 1.26 pages per session compared to 1.23 what we had in December 2019. But still, this is far below our target 2 pages/session.

Another problem we are seeing with the traffic is the bounce rate. Almost every month we are seeing the bounce rate going above 80%. This is something we have to work on and we are focusing on for the next few months.

If you’ll look for the average bounce rate of blog pages then it is between 70-90% and our blog fits there.

Bounce rate by industry
And we aim to lower the bounce rate by less than 70% for now. Here are some of the top techniques we are following to decrease the bounce rate of the blog-

  1. We are working to redesign the site to make it a little more appealing. For this, we are evaluating some of the Google AdSense optimized themes. We will share which one we finally have gone through.
  2. Instead of posting some content in the form of a blog page, we are working to create those as a landing page. For this, we are taking help from the Thrive landing page creator. There are many WordPress landing page creator plugins which you can review for the use. Some of these are free while others are paid.
  3. For the next few months, we are also focusing on creating some videos for the blog and we are expecting the bounce rate will improve from this.

Traffic report of a niche site in February 2020

February 2020 was even better for our site in terms of the traffic and we crossed total pageviews of 11.5k. So, our pageview increased by around 9%. But our page per session and bounce rate showed some decline.

Traffic report of a niche site in February 2020
As of now, our target in terms of the traffic is to cross 15000 page views per month. We hope in a couple of months, we will cross this target with an earning of $75 per month. We will update this post, with the updates and our milestones.

How to start a niche blog and make money?- Our story

Here are the exact steps I followed while creating a niche site. If you’re also looking to start a blog, you can follow these exact steps to get started. Overall, if I have to summarize the blog life cycle, then this image can be one of the best suited.

blog life cycle

#1 Niche Selection

Many say niche selection is the most difficult or at least one of the hardest jobs to execute while starting a blog.

Even I second that and should be chosen wisely. Earlier I have written a detailed post on a profitable blogging niche that you can choose as a reference.

The one that I selected was on the movie download. Although this is a heavy crowded site but still a lot of options for improvement. The major reason we selected this niche was-

  • Most of the movie downloading sites are illegal and those gets closed very quickly due to piracy
  • Movie downloading sites get popular in no time
  • And so, when a popular movie download sites get closed, people start looking for alternatives and this is where we worked

Although this is not an easy niche to work with as you have to keep an eye on the links and sites you’re using. For example, if you have listed site-A as the best downloading site and the next day that site got banned then you will have to update your list asap. This will help the user not to land on the non-working sites.

#2 Creating a WordPress site

The second step was to create a WordPress site on it. Although TricksRoad is on Blogger I start new blogs on WordPress due to more flexibility. And this niche site also I started on WordPress itself.

If you’re new to blogging and don’t have much idea on how to start a WordPress blog from scratch, you can follow the guide.

#3 Domain Selection- EMD vs PMD

Well, one thing that I have experienced is EMD (Exact match domain) no longer works!

For example, let’s say if you’re looking to start a blog on the main keyword- “dog food” then the EMD will be something like dogfood.com or dogfood.net or similar.

Means, the domain name is nothing but your keyword. This is called an exact matched domain name or EMD. Earlier (back in 2010 or 2012) this was working like superman in ranking especially for the niche site. But now search engines are way too smart and EMD doesn’t much impact the ranking in the search engine.

In late 2012, Google announced that it will change the low-quality EMDs and was announced by the then CEO of Google.

EMD Announcement by Google CEO
But still, if worked correctly, EMD adds a slight advantage over the generic domain name. There are many checklists while selecting the best domain name and you should follow those. Also, there are plenty of cheap domain name registrars which you can check for buying a domain name under $1.

In my case, I didn’t find an EMD and so I moved to PMD which stands for the partial matched domain. That means, if my main keyword is dog food then PMD will be something like dog-food.com, dogsfood.com, bestdogfood.com, dogfoodhq.com, etc.

#4 Hosting- Sharing hosting vs dedicated hosting

The next thing I want to talk about is hosting as many important factors like speed, uptime, etc. heavily depend on the hosting. I have talked a lot about hosting earlier and so, I am just sharing the references here.

I already had unlimited shared hosting and so, I directly hosted on the same without buying any new hosting for that niche site. If you’re a complete beginner then you may start with the free web hosting providers as well. Few things those you should look for while selecting the best hosting solutions for you-
  • Uptime
  • Technical support
  • Speed of the network
  • Security & backup solution
  • Pricing & renewal pricing
Usually, you can get a decent shared hosting at around $1-$2 per month. I recommend not going with dedicated hosting for the starters.

#5 WordPress theme selection

I am not a big fan of frequent theme selection and stick to the one for a longer period. There are many premium and free AdSense optimized themes that you can try.

As my niche blog was majorly focusing on the AdSense and so, I started with the Voice theme of Meks. You can buy this from ThemeForest which costs $69. It’s an amazing & multi-purpose theme and I highly recommend this.

WordPress theme selection
It’s not always required to buy a theme, you can also keep on using any free theme. And further use any plugin for the ads, the choice is yours!

Just make sure the site is optimized for all the devices- Desktop, Mobile, and Tablet. I receive around 17% mobile traffic which I expect to grow shortly and so, the site should be able to manage such users.

Traffic by device tricksroad

#6 Important WordPress Plugins

The main reason why I like WordPress most is due to the thousands of WordPress plugins available. You just name a feature and there will be many free and premium WordPress plugins available.

This has always been debatable on how many plugins you should use for your blog. I don’t go by number and instead just install when needed.

As of now, I am using 15 WordPress plugins for this niche blog for different purposes.

must have wordpress plugins
Here is the list of top WordPress plugins I am using in this blog-
  1. 1. Visual composer- for the page creation and landing page creation
  2. 2. Contact Form 7- For the contact form
  3. 3. Meks Flexible Shortcodes- for shortcuts like column, background, etc.
  4. 4. Easy Table of Contents- for a table of contents and is highly recommended
  5. 5. Meks Easy Ads Widget- Comes with the theme for the ads. If you will be using Ezoic, this is not required.
  6. 6. Meks Simple Flickr Widget- Comes with the theme to display your Flickr photos inside WordPress widget. Not compulsory to have.
  7. 7. Meks Smart Author Widget- Comes with the theme to display the author's image. Not compulsory to have.
  8. 8. Meks Smart Social Widget- Comes with the theme for displaying social media icons.
  9. 9. Meks ThemeForest Smart Widget- Comes with the theme and help you display ThemeForest items on your blog like affiliate banners
  10. 10. WP Review- Free plugin for the review of any page or posts. Highly recommended
  11. 11. Mighty Classic Pros And Cons- Another free and highly recommended plugin to show a pros and cons table
  12. 12. Thrive Architect- It's a premium plugin to design the landing page and other elements quickly
  13. 13. W3 Total Cache- It's a freemium plugin for Search Engine (SEO) & Performance Optimization (WPO) via caching. The free version will be sufficient for you
  14. 14. All in One SEO Pack- The WordPress SEO plugin which helps you write the title, description, evaluate keyword, and more. An alternative is Rank by Math and Yoast SEO plugin.
  15. 15. WPBakery Page Builder for WordPress- Free page builder plugin to create the elements. I have stopped using this after I installed Thrive Architect.

#7 Keyword Research

Once your blog is live, the next thing you might want to look for is the content. But before that, I would like to tell you about keyword research.

Don’t start with a random topic as this is a niche blog and you need a proper plan. for this keyword research will be highly helpful to you.

You can take the help of any keyword research tools like Ahrefs, Semrush, Google Keyword Planner, etc. to do keyword research. Even you can take the help of search volume display Google chrome extension like keyword surfer for this.

So, now let’s say you finalized the following 2 keywords for your blog (I would at least recommend going with 10+).-

  1. 1. Dog food
  2. 2. Purina dog food

Now look for the LSI keywords related to these main keywords. To get the Latent semantic indexing (LSI) keywords, you can take the help of Google search. LSI keywords are those keywords that people use with the main keyword.

For example, when you will search for “dog food”, you will find a list with the heading “Searches related to LSI keywords” at the end of the search page. Those are nothing but the LSI keywords. You should use these LSI keywords in the content as well along with the main keywords to attract more traffic.
LSI keywords
optimizing your content for these LSI keywords will help you rank for these keywords as well. And this will help you get more traffic.

#8 Content- Posts & Pages

After you have finalized your main keywords and LIS keywords, it’s time to draft the content. First, create some important pages like-

  1. 1. About
  2. 2. Contact
  3. 3. Privacy Policy
  4. 4. Disclaimer

These are the 4 mandatory pages one must create. And then start creating the main content. Initially, I would recommend you write a few evergreen contents. The number of words also impact the ranking for the keyword and research shows the below-

content length vs ranking
At least while starting, create some posts with 2000+ words and later you can keep adding 1000+ words. Make sure the content is making sense and not anything just for the sake of completing the words. Use your main keywords in the content, URL, headings, description, image meta tag, etc. Also, use the LSI keywords as and where required and suitable. Don’t make the keyword overcrowded so that it will look over-optimized for the search engines.

Research shows the below for the perfect keyword density-

Google keyword density
I kept the keyword density between 1-2%. This means in a 1000 words article, I used 4-5 times main keywords and 4-5 times a combination of long-tail keywords.

While writing the content, take care of your audiences as well. For example, I am getting maximum traffic from the age group of 25-34 and so, the content I am aligning is more inclined towards such groups.

Tricksroad traffic by age group
Another technique that I followed while writing the content is to personalize it. Similar to what I did for age, I also followed the gender. As my niche site was on movie niche and so, the taste of movies varies from age group to gender. I get 70% male traffic and 30% female traffic. And so, the content on the site is also distributed similarly.

Tricksroad traffic by gender
As I was working on the movie download niche and so, most of my content was related to alternatives. For example, putlocker is one of the top movie download sites and so, I used to write like top putlocker alternatives and similar articles. And as I was making the article based on data like on age groups, genders, location, etc. and so targeting was a little easy.

#9 On-Page SEO

After you have added the content, it’s time to optimize the content. This comes in the on-page SEO part where you don’t need anything extra and just optimize the existing content as per the ranking guidelines. I have written a mega guide on the on-page SEO optimization technique and I would recommend you going through that. For that niche blogs also, I used the same techniques listed here.

#10 Social Media pages & Social Signals

The next thing that I did was to create the social profiles for the blog. Although for the niche blog, you may not use it a lot it’s required to look genuine both from a user perspective as well as a search engine point of view.

I created the following profiles on social media-

  1. 1. Facebook page
  2. 2. twitter page
  3. 3. Instagram page
  4. 4. Pinterest page
  5. 5. Linkedin Profile
  6. 6. YouTube channel

Remember, most of these sites give you a backlink also which will eventually help in off-page SEO.

After I created the profiles, I bought some social signals like Facebook likes, Twitter followers, and some YouTube views. To buy these, I ordered around 1000 Facebook likes, 500 Twitter followers, and 5000 YouTube views. This I simply bought from Fiverr.

Although these are not the best but to start with, it’s decent. Just make sure you are not buying the Chinese likes or followers.

#11 Link Building: Off-page SEO techniques

This was the tricky and hardest part. After getting some social signals, I kept on adding the content and started interlinking. After keeping the site for around a month, I started building links and followed the following techniques for the same-

1. Comment backlink

To keep the backlink profile look natural, I started doing some blog commenting. I did it manually and found a success of around 60%. That means, if I commented on 10 blog posts, 6 of them were approved. But remember, usually comment backlinks are no-follow backlinks but still useful. Here is the list of 25 commentluv enabled sites to get comment backlinks.

2. PDF submission sites

The next thing I did was to submit some PDFs to the PDF submission sites. This way also, I created around 50+ links. Please note that you don’t create all the links in a day. Keep it diversified so that it will look natural and will avoid the Google penalty. I followed around 10 links per day.

3. Guest posts

Later on, I bought around 15 guest posts that were DA 20+. For this, I took the help of Risement and they outreach for us and delivered in 15 days. So, we got 15 very high-quality dofollow backlinks from those 15 guest posts. If you want, you can also connect with them at risementmail@gmail.com.

These were the three techniques I followed to get the backlinks for the site. By the time, I started doing guest posting, I found traffic was increasing and the site was ranking on the first page for a couple of keywords but of low searches.

#12 Signed up for Ezoic

Once the traffic reached around 5000+, I thought to start monetizing it. Although there are many techniques to earn from the blog, I followed the AdSense one due to the niche selected. I already had an account with Ezoic for my other blog and so, I just added this site to my account and integrated the site for the ads to serve.

Within a day, the ads were visible to the site and I started earning from it. As of today, the site gives between $1-$4 per day depending on the traffic.

Conclusion

These were all about how I started a niche blog and started earning $60 per month with almost no work. Initially, I worked but later the site is on auto-mode.

So far, I have published around 15 HQ articles and 10 normal articles. I have been a little slow these days but have planned to put at least 1 good article per week.

These are the exact steps I followed and you can do so. If you’re also looking to start a niche blog, just follow the guide and comment below, if you need any clarification.

I hope you found this guide on how to start a niche blog useful. If you did, please share it with others as well. Here is the video tutorial of the same-


5 Pro Tips for Student Blogging

By Ashutosh Jha → Thursday, March 4, 2021
Millions of people around the world want to be bloggers but only a few can master the art. Many others start blogs that eventually fail to attract traffic or the revenue desired. What if you could learn from pro bloggers who are racking all the traffic on the internet and at the same time enjoying excellent fortune?
 
To help you concentrate on blogging, visit this website to get expert writers who will take over your school assignments, making the load lighter for you.


A student has a lot of time between lessons and when assignments are yet to pile up to work on a blog. In fact, blogging is one of the avenues a student can use to earn money while still in college. When executed successfully, a blogging venture can be turned into a career such that you will not need to look for a job upon graduation.

Undoubtedly, blogging is not easy. It has excellent success stories as well as numerous failure tales. Here are tips from pros on how to blog as a student and attract desired traffic as well as generate revenue.

Student Blogging Pro Tips

Let's start and look at some of the top student blogging pro tips-

Blog What You Love

The best bloggers in the world do it out of passion. In fact, you can feel the enthusiasm in every work and line written on their blogs. If you aim to succeed as a blogger, you must target blogging in an area you are really passionate about.

Passion gives you insightful ideas to use for your blog posts. It also keeps you writing despite minimal traffic and lack of revenue. Because you love the theme of your blog, your content will be captivating to read.

Develop And Stick To A Plan

Once you create a blog, it ceases to be a private platform or idea. Followers demand regular and quality content from the page. The kind of consistency required to run a blog can only be achieved with a concrete plan.

A blogging plan requires the identification of a target audience to shape your content. Set a particular day and time when you will be creating and sharing content. Determine the kind of content you will be creating for your blog. Once you establish a plan, stick to it. Top blogs have established a relationship with followers. As a result, the followers expect particular treatment. Such a plan and the resulting consistency build and sustain the relationship with your audience.

Create Captivating Content

A blog is sustained by consistent and captivating content. Whether you will be using videos, images, or text, ensure that it is engaging and of high quality. The best content is relevant to the theme of your blog. It must be prepared at the right time so that it resonates with the target audience. Engage your audience using interesting questions, an invitation to comment, like, and even share your content, among other tricks. If the content adds value to the lives of your followers, they will have a reason to return to your blog.

Use Social Media

Utilize the power of social media to grow your blog. Social media is used to attract attention by posting a link that will send people to your site. Collect data from social media engagements and use it to improve your plan.

Social media is also crucial when looking for feedback. Visitors will always comment on the content shared on the blog through social media. Invite readers and followers to share your link on social media to enhance visibility and traffic to your blog.

Monetize The Blog

Developing and running a blog requires a lot of time and resources. In some cases, you promote the blog on different platforms, helping you reach more people. It also takes time and energy to create the content on your blog.
 
How do you recover these resources?
 
Monetization is the secret to running a rewarding blog as a student. Leverage the traffic coming into your website. You may also look for endorsements by brands in the area where you operate. The revenue you generate through the blog makes your effort worthwhile.

A blog requires time and commitment to run it successfully. Plan your time so that the demands of the blog do not affect your academic performance. If you take the tips seriously, you will enjoy excellent revenue and reward for your effort.

5+ Best WordPress Autoblogging plugins for Content Curation

By Ashutosh Jha → Saturday, January 2, 2021
WordPress autoblogging plugins help us to keep our blog and website refresh and keep it growing. Many times we face this issue that we don’t get much of the time to maintain the blog and you should be ready to maintain your blog when you are busy.

However, it is not that easy to create fresh content every day and especially when you’re too busy. Another issue is that, many of us can’t afford freelance writers to write the new content and if we can also, there is no guarantee that it will be of the high quality that we expect from our blog.

WordPress Autoblogging plugins

Recently I have started a niche blog (I’ll write the case study as for how it will perform further) and have hired a girl for the content. She is delivering the content on time but not getting the quality that I expected and so have to spend much of the time to edit that article. So another approach to this is the WP Autoblog plugin.

WordPress auto content generator can help you in such a scenario. This WordPress autoblogging plugin allows you to generate free content for your blog.

Top WordPress Autoblogging Plugins

So here are the top WordPress autoblogging plugins for you to create fresh content for your blog and website. Some of these WP Autoblog plugins are free while others are paid and you’ll have to pay to have those plugins.

1. WP RSS Aggregator - FREE auto blogger plugin

WP RSS Aggregator is considered as one of the best autoblogging WordPress plugins and is completely free. This plugin is used for importing, merging, and displaying RSS and Atom feeds on your WordPress site.

WordPress Autoblogging plugins

With this free core version of WP RSS Aggregator, you’ll be able to aggregate as many RSS feeds from as many sources as you'd like. The most important feature that I liked about this autoblog WordPress plugin is, it is highly customizable. You can arrange the feeds as per your need.

Here you can select the feed time interval and can also open the external links in the new tab and much more.

Here are the few amazing features of WP RSS Aggregator-

• You can always export a custom RSS feed depending upon your feed sources.

• It allows you to display your imported feed items with the help of a shortcode.

• You can set the name of the feed source along with the features like pagination, date format, and links as well.

• You’re allowed to limit the number of feed items in the database.

• It also can open video websites like Daily Motion, YouTube, and Vimeo directly on your blog.

• I guess the above features are enough for you to choose this plugin and if not, then here are some of the add-ons available for it.

• Categories – This add-on allows you to show your content in an organized way and according to the category you wish to show first.

• Full-Text RSS Feeds – It connects you to the Full-Text premium service and hence you get unlimited feed items for every single feed.

• Keyword Filtering – As the name suggests, it imports the feeds as per the keywords set by you.

• Excerpts and Thumbnails – It clear by the name, the add-on shows excerpts and thumbnails with the title, date, and source as well.

2. FeedWordPress – FREE auto blogger plugin

FeedWordPress is another free autoblogging WordPress plugin and can be helpful to create free content.
WordPress Autoblogging plugins

FeedWordPress is an Atom/RSS aggregator for WordPress. It syndicates content from feeds that you choose into your WordPress weblog; the content it syndicates appears as a series of special posts in your WordPress posts database.

The best thing that I liked about this free autoblog plugin is, here all the incoming categories will be turned into tags and if there is any new category, the system will automatically make it a new tag.

3. WPeMatico - FREE auto blogger plugin

If you’re looking for a decent and easy to use WordPress autoblogging plugin, I would suggest going with WPeMatico. This is quite a decent and very easy to use with lots of customization available.

WordPress Autoblogging plugins

This plugin also offers you a nice interface like the default WordPress to manage all the feeds you import. Here you can import feeds from multiple sources and can arrange as per your need so that it can look better.

4. WP Robot – Premium auto blogging plugin

WP Robot is one of the best WordPress auto content generators but it is a premium autoblogging plugin. Though it is a paid one, believe me, every penny of its worth. You will clearly identify the difference between the free autoblog plugin and the paid one in terms of quality, in terms of ease of use, and much more.

WordPress Autoblogging plugins

You can use this plugin with any WordPress theme and with any version. Another important feature of WP Robot is, you can insert your affiliate links in the content. Currently, WP Robot supports more than 20 affiliate links including Amazon, eBay, and much more.