All-in-One WP Migration Plugin is one of the best WordPress plugins for WordPress website migration. It allows you to export the backup of the existing WordPress website and then import it to somewhere else.
But the problem is, All-in-One WP Migration Plugin free version allows a limit of only 128 MB size which is too small for any site. Even for a small WordPress site, the file size will be around 200-400 MB.

As you can see from the above screenshot, the maximum limit for file upload is 128 MB only. This can vary from version to version of All-in-One WP Migration Plugin.
And even for a small site, this is not enough and if you’ll go with the premium version then you need to buy it.
If you don’t want to pay for this, then this article on How to Increase Upload Limit of All-in-One WP Migration Plugin is for you.
By this time, I assume that you have already taken the backup of your site and have installed WordPress on some other platforms like Google Cloud, Digital Ocean, etc. You may also check how to start a WordPress site from scratch to understand more.
Note: Some platform allows this plugin by default. And so, if that is already installed and even though you will install the version 6.77, still it will create the new version. To avoid this, you need to delete the file related to All-in-One WP Migration Plugin from the folder and then install the version 6.77 or lower.


We have added that 20 to it as a multiplication factor. This will increase the max upload file size is 10 GB. If you need even more, just increase that factor (which is 20 here). Once done, please save the changes.
Here you should find the updated maximum file upload size.

If you’re a tech-savvy guy, you may make changes directly by accessing the constants.php file from the file directory. You can find constants.php file by following the below directly- /wp-content/plugins/all-in-one-wp-migration/constants.php
But the problem is, All-in-One WP Migration Plugin free version allows a limit of only 128 MB size which is too small for any site. Even for a small WordPress site, the file size will be around 200-400 MB.

As you can see from the above screenshot, the maximum limit for file upload is 128 MB only. This can vary from version to version of All-in-One WP Migration Plugin.
And even for a small site, this is not enough and if you’ll go with the premium version then you need to buy it.
If you don’t want to pay for this, then this article on How to Increase Upload Limit of All-in-One WP Migration Plugin is for you.
By this time, I assume that you have already taken the backup of your site and have installed WordPress on some other platforms like Google Cloud, Digital Ocean, etc. You may also check how to start a WordPress site from scratch to understand more.
The requirement to increase Upload Limit of All-in-One WP Migration Plugin
To increase the upload limit of All-in-One WP Migration Plugin, you should have the plugin version 6.77 or lower. You can download the lower version of the plugin from here.Note: Some platform allows this plugin by default. And so, if that is already installed and even though you will install the version 6.77, still it will create the new version. To avoid this, you need to delete the file related to All-in-One WP Migration Plugin from the folder and then install the version 6.77 or lower.
How to increase Upload Limit of All-in-One WP Migration Plugin
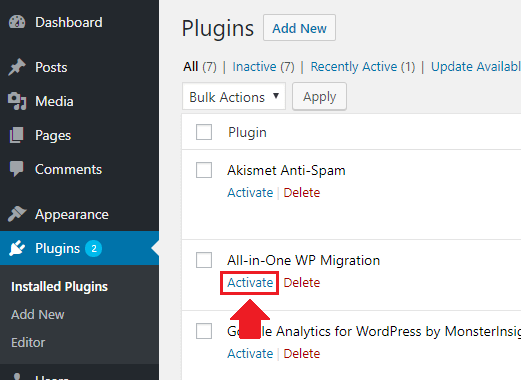
Once you’ve ensured the above steps, it’s time to increase the upload limit of All-in-One WP Migration Plugin. To do that, please follow the below steps-Step-1: Activate All-in-One WP Migration Plugin
From your WordPress admin dashboard, follow Plugin → Installed Plugins → All-in-One WP Migration Plugin → Activate
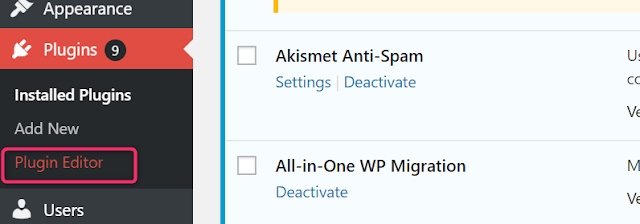
Step-2: Open Plugin Editor interface
Again go to the WordPress admin dashboard and follow Plugins → Plugin Editor
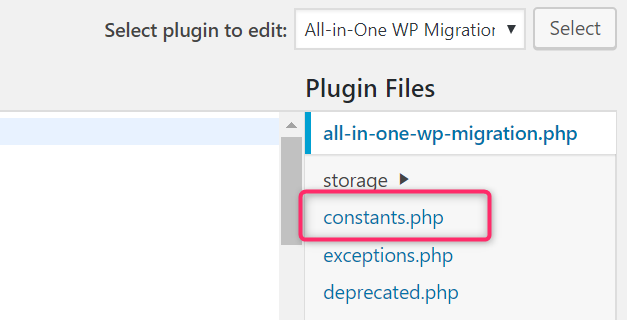
Step-3: Select the All-in-One WP Migration Plugin
At the top right corner, you will find an option for the selected plugin to edit. Select All-in-One WP Migration Plugin from the drop-down and then click on the select button.
Step-4: Open constants.php
Here you will find all the files related to the plugin. From the files, please select constants.php.
Step-5: Increase Upload file max size
Here go for line number 249. This may change from version to version as well. In that case, search for the term “Max File” and you will find lines something like below-
We have added that 20 to it as a multiplication factor. This will increase the max upload file size is 10 GB. If you need even more, just increase that factor (which is 20 here). Once done, please save the changes.
Step-6: Check the changed new max file size
Just to ensure that the changes have taken place, please follow again dashboard → All-in-One WP Migration Plugin → ImportHere you should find the updated maximum file upload size.

Conclusion
These were all about how to increase the Upload Limit of All-in-One WP Migration Plugin. This way you can import the bigger file as well without paying a single penny. Do try this and if you find any issue, please comment below and will solve your issue.If you’re a tech-savvy guy, you may make changes directly by accessing the constants.php file from the file directory. You can find constants.php file by following the below directly- /wp-content/plugins/all-in-one-wp-migration/constants.php
No Comment to " How to increase Upload Limit of All-in-One WP Migration Plugin "
Please make your real thoughts/comments and don't spam. Spam comments will be removed immediately.