Whenever you run into an issue where you need to re-install your OS or software due to certain malware inflictions or system malfunctioning, you must have encountered the term “ISO image”. So basically, what are these ISO images and what do they do exactly?
Well, on a precise note, they are images containing a lot of information, regarding operating systems and software in a compressed format. It makes it easier for software dealers and vendors to transfer software to various clients. Had it been too large in size, it would have been a bit cranky to share across the internet.
 Now once you get a hold of ISO image files, you need to transfer it to a USB drive. A mere copy-paste mechanism here would not do the job on a smoother stride. You need to literally burn the images into the USB drive to make it bootable. And for that very reason, you need ISO burner tools.
Few of those ISO burner tools are explained below in the article to make your job easier.
Step 1: Download the program file from the official website and install it with all terms and conditions.
Step 2: Right-click on the setup file and choose “Run as Administrator” to exercise the admin privileges.
Step 3: Click on the menu bar and then “Bootable” option and then “Write Disk Image”. A disk image dialogue box would pop-up.
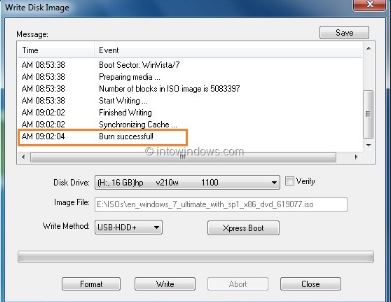
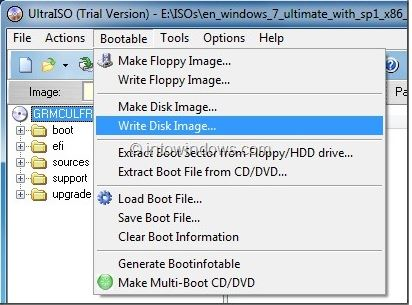 Step 4: Select the disk type and then write “USB-HDO” and then press the click the “Format” button.
Step 5: Click “Ok” on completion of the formatting.
Step 6: Now click “Yes” to start the burning process. You will be notified with a notification when the burning is done.
Step 1: Download the program file and install it properly to avoid any malfunctioning in between.
Step 2: Insert your USB to your accessible computer and run the program file.
Step 3: Click “Open” button to fetch the ISO file and select the disk type from the drive section.
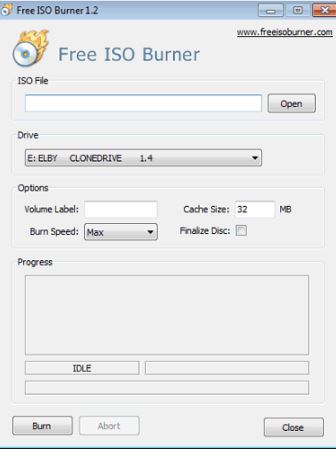 Step 4: Finally, click on “Burn” button to start the burning ISO image process.
It will take few moments and your job will be done.
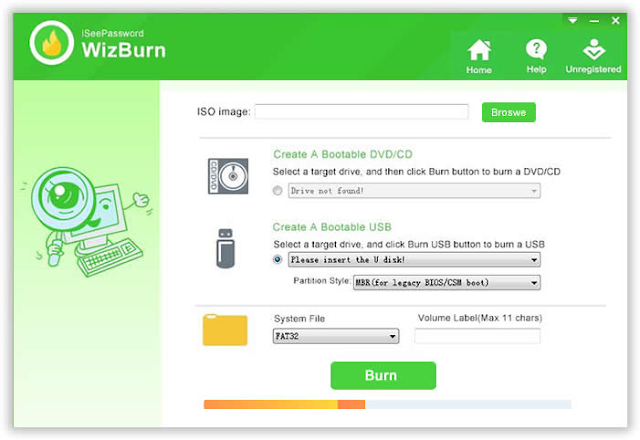
Step 2: Launch the program with admin privileges and click on “Browse” button to select your ISO image file which is to be burnt here.
Step 3: Click on “Create a bootable USB” since we are using a USB device here.
Step 4: Once you have set in motion all your priorities, choose your file type as FAT, FAT-32, NTFS, etc and click “Burn” button to start the burning of ISO images into the vacant USB drive.
Well, on a precise note, they are images containing a lot of information, regarding operating systems and software in a compressed format. It makes it easier for software dealers and vendors to transfer software to various clients. Had it been too large in size, it would have been a bit cranky to share across the internet.

Few of those ISO burner tools are explained below in the article to make your job easier.
#1: Burn ISO using UltraISO
UltraISO is a ludicrously famous ISO burning tool which can easily burn ISO images to your USB in no time. It is compatible with Windows 7/8 OS versions and can create bootable USB or CD/DVD. But we would here restrict our conversation to USB drive only. Read the steps explained below to know the tool in detail:Step 1: Download the program file from the official website and install it with all terms and conditions.
Step 2: Right-click on the setup file and choose “Run as Administrator” to exercise the admin privileges.
Step 3: Click on the menu bar and then “Bootable” option and then “Write Disk Image”. A disk image dialogue box would pop-up.

Step 5: Click “Ok” on completion of the formatting.
Step 6: Now click “Yes” to start the burning process. You will be notified with a notification when the burning is done.

CONS:
- The tool is outdated so will take time than the usual time.
- The method is a bit complicated than the other ISO burning tools.
#2 Burn ISO with FreeISOBurner
FreeISOBurner is yet another ISO image burning tool which we are going to use here to burn ISO image files to USB. It burns the image file with greater speed and thus saves a lot of your valuable time. All that you require is a working computer, the ISO source file, and the FreeISOBurner program file. The steps are outlined as follows:Step 1: Download the program file and install it properly to avoid any malfunctioning in between.
Step 2: Insert your USB to your accessible computer and run the program file.
Step 3: Click “Open” button to fetch the ISO file and select the disk type from the drive section.

It will take few moments and your job will be done.
CONS:
- Since the tool is outdated, it might contradict with your system compatibility.
- The process may take longer time than expected depending upon the size of the ISO file.
#3 Burn ISO with iSeePassword WizBurn
iSeePassword WizBurn is one of the most advanced ISO burning tools which can be used to burn ISO image files to USB/ CD/DVD in the blink of an eye. There is hardly any negative feedback from the millions of its users across the internet.Salient Features:
- It supports both windows 32-bit and 64-bit OS versions.
- It works for both MBR (legacy BIOS/CMS boot) modes and GPT (UEFI boot).
- Technical support for customers is available all the time.
- It supports all sorts of system files- FAT, FAT 32, and NTFS.
- No extravaganza technical skills are required.
- Internet connection is not mandatory while using the tool.
- It supports all kinds of Windows operating system- XP/ Vista/ 7/ 8/ 10.
Pre-Requisites to use iSeePassword WizBurn Software:
- A spare accessible computer.
- The iSeePassword WizBurn Tool.
- The source ISO image file.
Methodology to use the tool:
Step 1: Download the iSeePassword WizBurn Program file and install it accurately with the help of a spare working computer.Step 2: Launch the program with admin privileges and click on “Browse” button to select your ISO image file which is to be burnt here.
Step 3: Click on “Create a bootable USB” since we are using a USB device here.
Step 4: Once you have set in motion all your priorities, choose your file type as FAT, FAT-32, NTFS, etc and click “Burn” button to start the burning of ISO images into the vacant USB drive.

No Comment to " 3 Ways to Burn ISO to Create Bootable USB "
Please make your real thoughts/comments and don't spam. Spam comments will be removed immediately.